How to Cook Juicy Ribs on a Grill

The allure of grilled ribs lies in their deeply savory, smoky flavor, and satisfyingly tender texture. The low and slow cooking process coaxes out the richness of the pork, while the kiss of the grill imparts a delightful char. A carefully balanced rub and glaze amplify these flavors, creating a complex, addictive dish. This method, focusing on indirect heat and a flavorful glaze, ensures consistent results and avoids the dryness that can plague lesser rib recipes.
Grilling ribs is a quintessential summer cooking experience. Unlike oven-baked ribs, grilling infuses the meat with a subtle smokiness that elevates the dish. Mastering this technique allows you to bring the taste of a professional barbecue pit to your own backyard, impressing friends and family with tender, fall-off-the-bone ribs.
Understanding Baby Back Ribs
Baby back ribs, also known as pork loin ribs, are cut from the upper portion of the pig's rib cage, near the spine. They are shorter and more curved than spare ribs, with a higher meat-to-bone ratio. The meat is tender and relatively lean, making them a popular choice for grilling. When selecting baby back ribs, look for racks that are pink in color with good marbling throughout the meat. Avoid ribs that appear pale or have excessive amounts of surface fat.
High-quality ribs will have a consistent thickness and a fresh, clean smell. Many butchers will remove the thin membrane (the silverskin) from the back of the ribs, but if they haven't, you'll need to do this yourself for the best results. The silverskin prevents the rub and smoke from penetrating the meat.
Why Cook Ribs This Way?
- Versatility: This method works well with different grills (gas or charcoal) and can be adapted to your preferred level of smokiness.
- Flavor: The combination of a dry rub, apple juice braise, and marmalade glaze creates layers of flavor from savory to sweet and tangy.
- Convenience: Using an aluminum pan for the initial braising step simplifies cleanup and helps maintain moisture.
Preparation (Mise en Place)
- Thawing: If frozen, thaw the ribs in the refrigerator for 24-48 hours before grilling. Never thaw at room temperature.
- Removing the Silverskin: Flip the ribs over so the bone side is up. Use a butter knife to gently pry up a corner of the silverskin membrane. Grip the edge with a paper towel and pull firmly to remove the entire membrane. This step is crucial for tender ribs.
- Cutting (Optional): For easier handling on the grill, cut the rack of ribs in half crosswise.
Essential Tools
- Large Aluminum Pan: This is essential for the braising step, as it contains the apple juice and helps keep the ribs moist. We recommend a disposable pan for easy cleanup.
- Grill with Lid: A grill with a lid is essential for maintaining a consistent temperature and trapping the smoke. Gas or charcoal grills both work well.
- Meat Thermometer: A reliable meat thermometer is crucial for ensuring the ribs are cooked to the proper internal temperature for tenderness.
- Basting Brush: Use a silicone or natural-bristle brush to apply the marmalade glaze evenly.
The Cooking Method(s)
Here, we will be using a single method which combines braising the ribs in the aluminum pan, followed by direct grilling.
Grilled Ribs with Marmalade Glaze
Ingredients:
- 1 rack baby back pork ribs (about 2-3 pounds)
- ½ cup pork seasoning rub (see note below)
- 1 cup unsweetened apple juice
- ½ cup orange marmalade
- ¼ cup apple cider vinegar
Pork Rub Recipe (optional):
- 2 tablespoons brown sugar
- 2 tablespoons paprika
- 1 tablespoon garlic powder
- 1 tablespoon onion powder
- 1 tablespoon kosher salt
- 1 teaspoon black pepper
- ½ teaspoon cayenne pepper (optional, for heat)
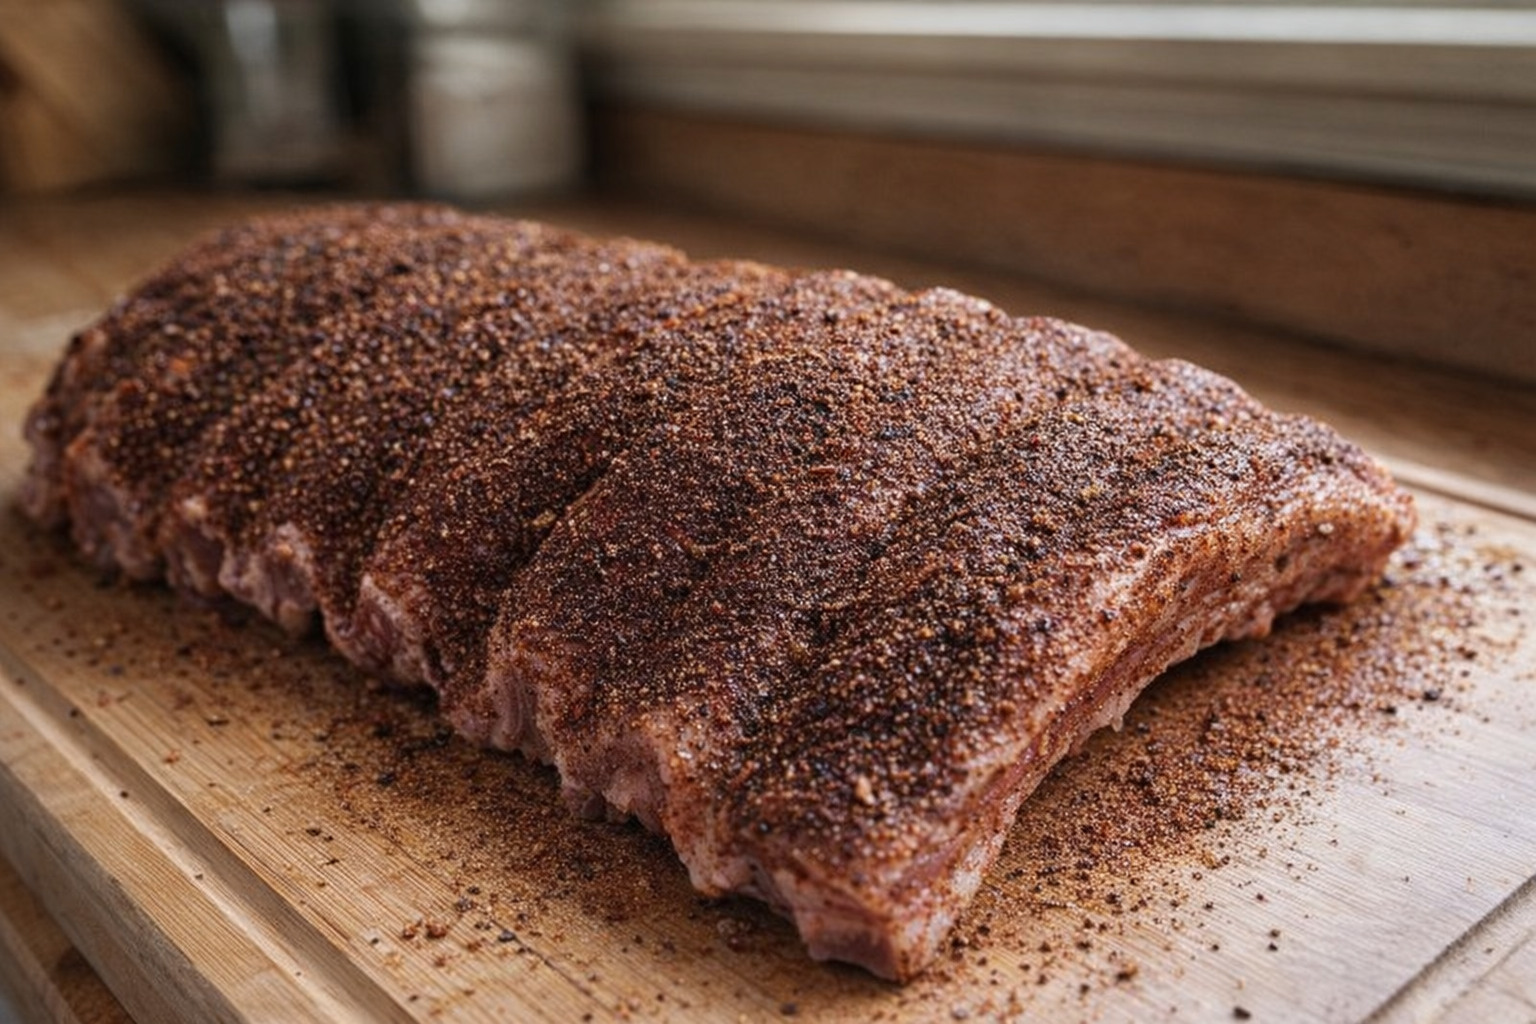
- Prepare the Ribs: Remove the ribs from their packaging and pat them dry with paper towels. This allows the rub to adhere better. Lightly spray a large aluminum pan with nonstick cooking spray. Place the ribs in the pan.
- Season the Ribs: Generously sprinkle the pork rub on both sides of the ribs, massaging it into the meat. Cut the rack in half if desired. Pour the apple juice into the bottom of the pan. Cover the pan tightly with aluminum foil and refrigerate while you prepare the grill, allowing the flavors to meld. The aroma of spice will fill the fridge as the dry rub begins to work its way into the meat.
- Prepare the Grill: Preheat your grill to 300°F (150°C). For a three-burner grill, keep the middle burner off and the two-end burners on low for indirect heat. Clean the grates thoroughly and wipe them down with oil to prevent sticking.
- Braise the Ribs: Place the covered pan of ribs onto the grill and close the lid. Cook for 1 hour, checking the temperature regularly. Depending on your grill, this may take up to 2 hours. Listen for the gentle simmer of the apple juice – this is key to keeping the ribs moist.
- Prepare the Glaze: While the ribs are cooking, combine the orange marmalade and apple cider vinegar in a small saucepan over medium heat. Whisk until well combined and slightly warm. The mixture should become a smooth, glossy glaze. The tangy vinegar will cut through the sweetness of the marmalade, creating a balanced flavor profile.
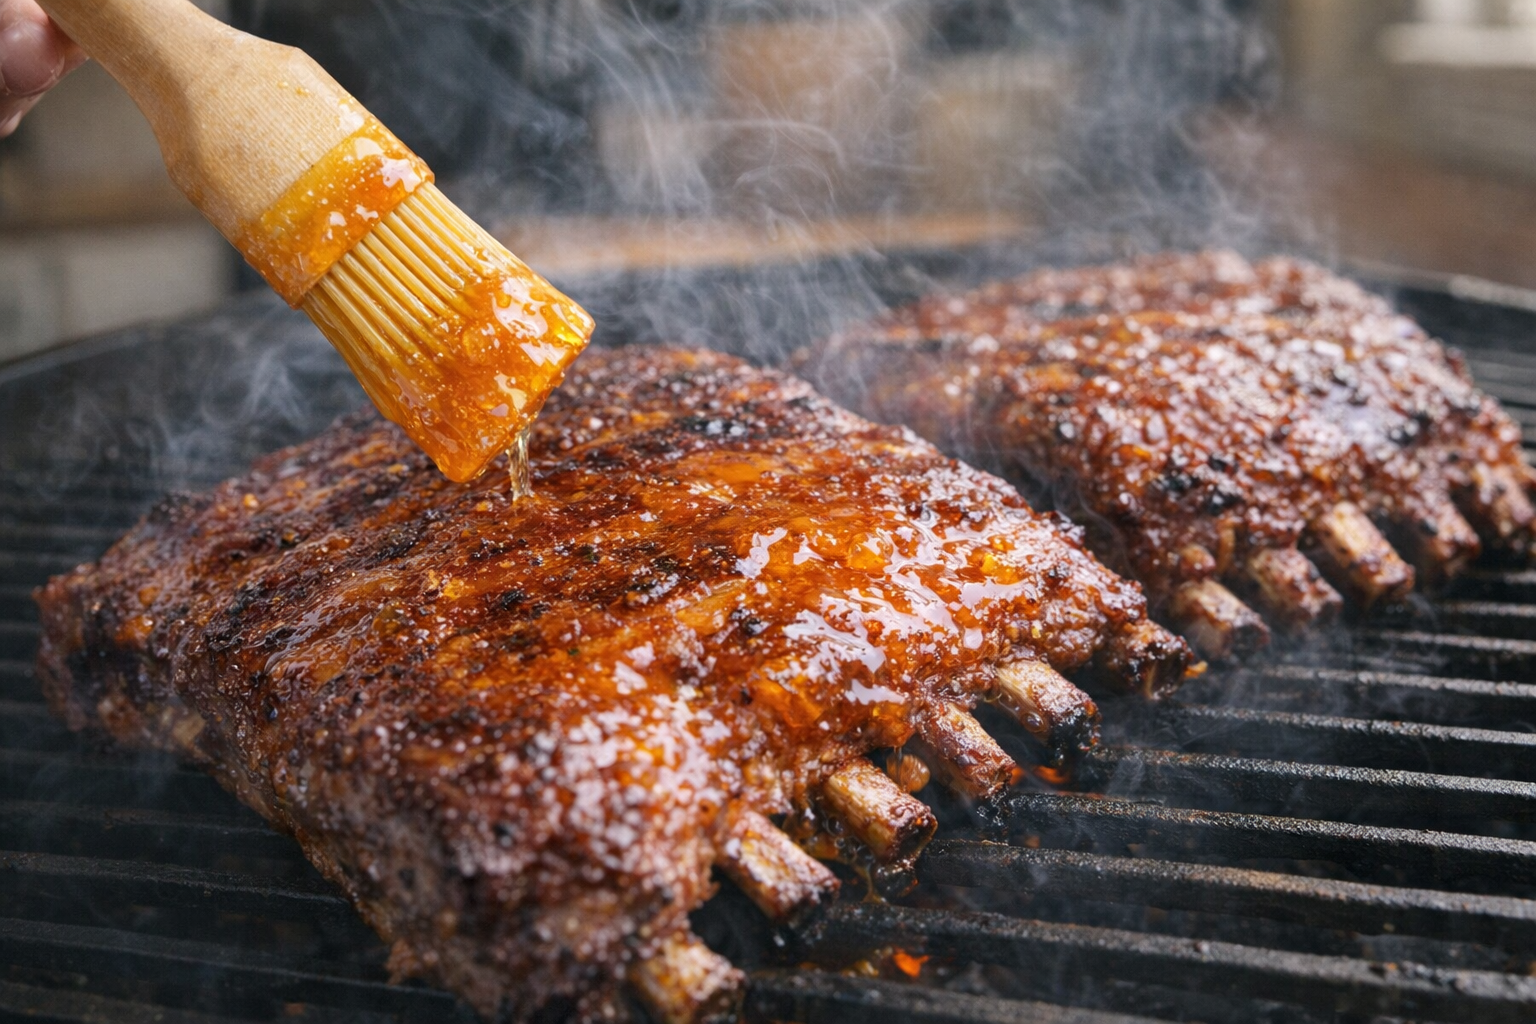
- Grill and Glaze the Ribs: Carefully remove the ribs from the pan and place them directly on the grill grates, keeping the heat on low. Baste generously with the marmalade glaze, coating every inch of the ribs. Close the grill and cook for 5 minutes to allow the glaze to set. Repeat the basting process and cook for another 5 minutes. The glaze will start to caramelize, creating a beautiful, sticky coating.
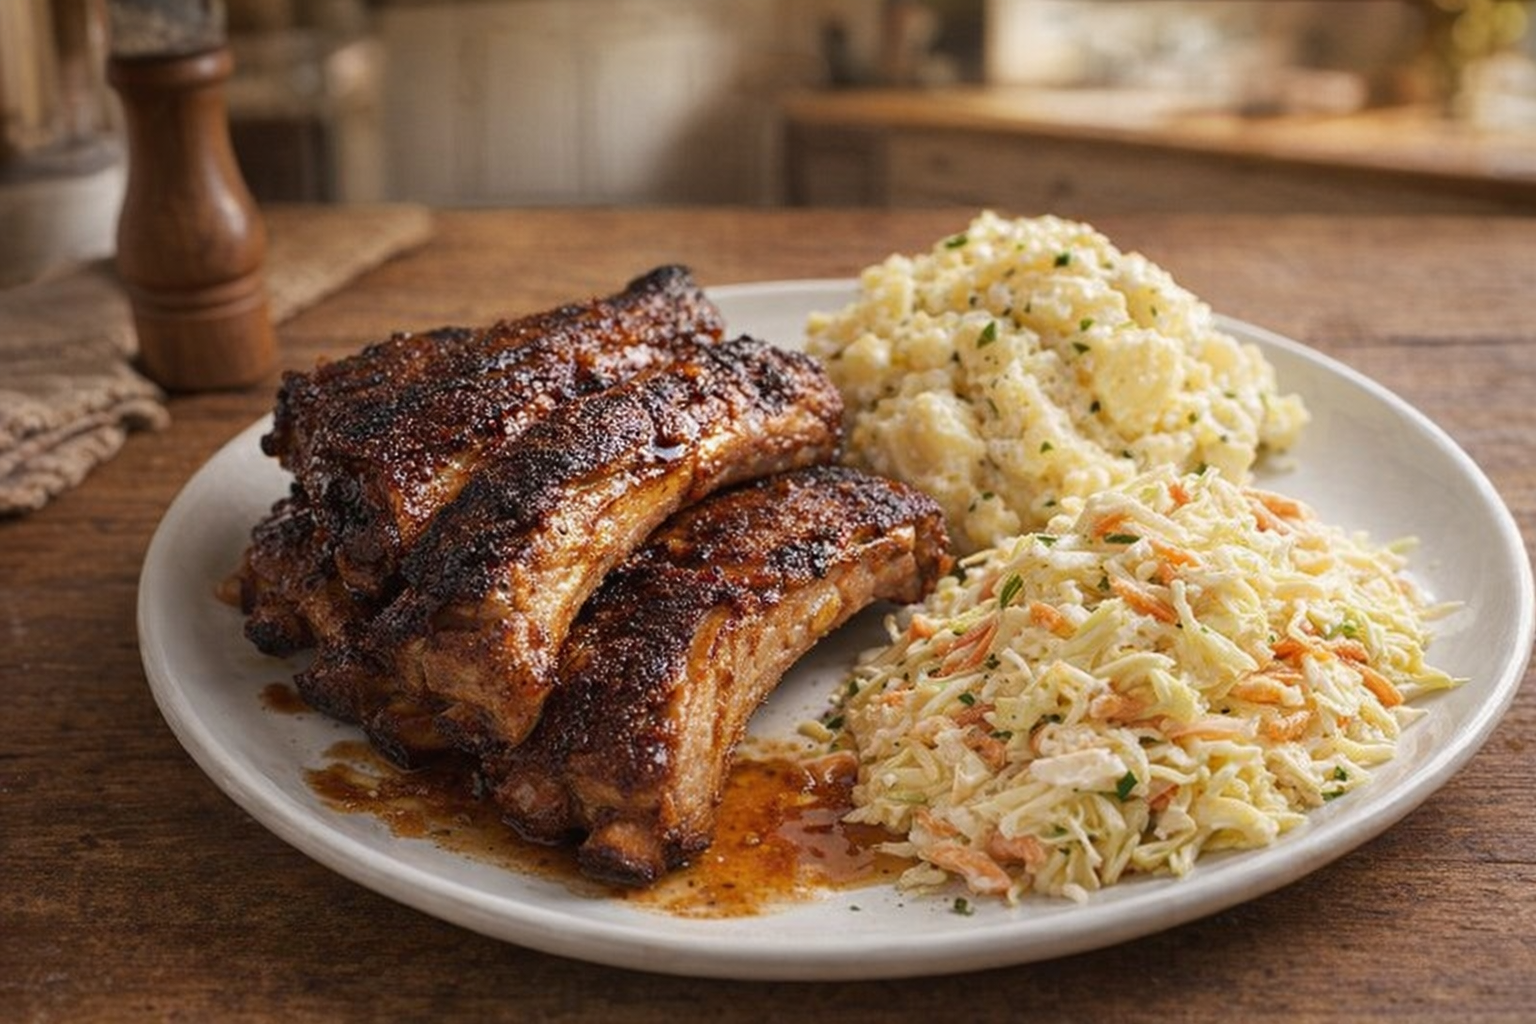
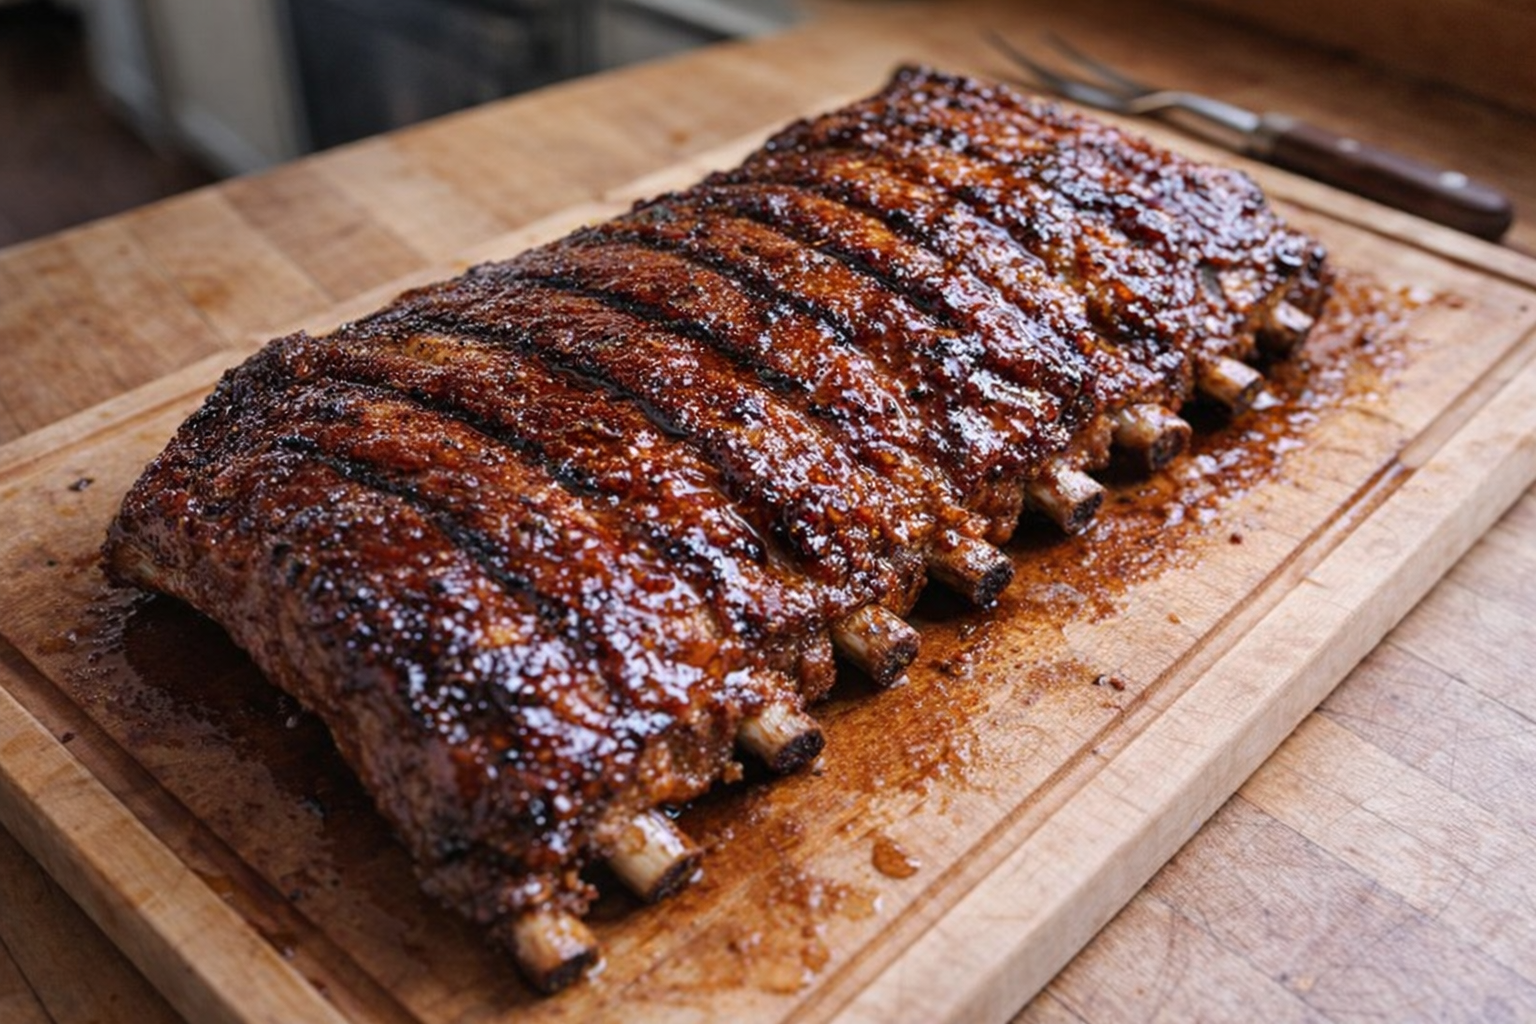
- Rest and Serve: Remove the ribs from the grill and place them on a cutting board. Allow the meat to rest for at least 10 minutes to redistribute the juices. Use a sharp knife to cut between the bones, separating the ribs. The meat should be tender and easily slide off the bone.
Cooking Time & Doneness Guide:
- Target Temperature: 180-190°F (82-88°C) for maximum tenderness.
- Cooking Time: Approximately 1.5-2.5 hours total (1 hour braising, 10 minutes glazing).
Visual Cues
The meat should have pulled back from the ends of the bones by about 1/2 inch. The ribs should be easily pierced with a fork, and the meat should feel very tender.
Tips for Perfection:
- Don't overcrowd the grill: If necessary, cook the ribs in batches to ensure even cooking.
- Maintain a consistent temperature: Monitor the grill temperature closely and adjust the burners as needed.
- Avoid overcooking: Overcooked ribs will be dry and tough. Use a meat thermometer to ensure they are cooked to the correct temperature.
- Rest the ribs: Resting allows the juices to redistribute, resulting in more tender and flavorful ribs.
Storage & Reheating
- Storage: Store leftover ribs in an airtight container in the refrigerator for up to 3-4 days.
- Reheating: The best way to reheat ribs is in a low oven (250°F or 120°C) for about 20-30 minutes, or until heated through. You can also reheat them on the grill over low heat, basting with additional glaze. Microwaving is not recommended, as it can dry out the meat.
Serving Suggestions:
- Classic BBQ Plate: Serve with coleslaw, potato salad, and baked beans for a traditional barbecue feast.
- Rib Sandwiches: Shred the rib meat and pile it onto toasted buns with your favorite BBQ sauce.
- Rib Tacos: Use the rib meat as a filling for tacos, topped with salsa, cilantro, and a squeeze of lime.
- Rib Bowls: Combine the rib meat with rice, beans, and your favorite toppings for a satisfying and flavorful bowl.
Frequently Asked Questions
Yes, you can use spare ribs, but they will require a longer cooking time due to their higher fat content and thicker meat. Adjust the cooking time accordingly and ensure the internal temperature reaches the desired level for tenderness.
If you don't have apple juice, you can substitute it with other fruit juices like pineapple juice or white grape juice, or even chicken broth. These will all add moisture and a subtle flavor to the ribs during the braising process.
Allow the ribs to cool completely before storing them. Wrap them tightly in aluminum foil or place them in an airtight container and refrigerate for up to 3-4 days. Reheat them gently in the oven or on the grill until warmed through.
A good indicator of doneness is the "bend test." Pick up the rack of ribs with tongs near the middle; if the ribs bend easily and the meat starts to crack, they are likely done. You can also insert a toothpick between the bones – if it goes in with little resistance, the ribs are ready.